It’s been a long while, but I’ve finally put together this video tutorial! My wash and go routine remains the same, and the consistency has proven positive for my curly mane. You’ll notice that I still use my go-to products but feel free to swap them out as needed to work with your hair. I hope this helps your curly mane. Got questions? As always, drop your q’s down below. Want to see more videos, please subscribe to my YouTube channel.
You probably have noticed that I’ve been doing some research on the science behind our natural hair.
You say: Luuuuccy, you’ve got some ‘splaining to do!
I say (throws hands in the air): But Riiiicky, let me explain!
In case that all went over your head, you gotta catch at least one episode of I Love Lucy–throwback!
Back to my point. I basically wanted to nail down and discuss (in an easily digestible way) some of the key items that affect our hair. This includes all the things that I skipped learning about while I was also learning to embrace my natural hair … for the second time!
Yes, you got that right. A few years ago, I decided to embrace my curly hair (during round two, following straightening addiction), but I overlooked some important elements becaaaause … weeeelllll … there was all this talk about all sorts of scientificy stuff. Ain’t nobody got time for that (folds hands at chest)! Well, at least that’s what I initially thought until I realized that it was taking forrrreeevvvver for my hair to grow! I decided that it couldn’t hurt to do some hair homework.
Between that time and now, I’ve gathered some information, which has been included in my new free, e-book (shameless plug). One of those topics that you need to know about is discussed below–humectants. In case you’re not quite sure how these suckers work, I’ve broken it down for you below. Have no fear, Super Nay is here! 😉 Read more after the jump.
Super Nay (the heroine in my head, ha!). Art by Nay, inspired by Wonder Woman.
What Are Humectants?
Humectants are ingredients and/or products that promote moisture retention. I won’t delve too deeply into compounds and molecules. Just know that these items have a chemical structure that attracts water from the atmosphere and binds it to the molecule. In other words, humectants are attracted to moisture, whether it is in your hair or in the atmosphere, but they work best in moderate climates.
What’s The Impact of High Humidity?
When it is highly humid outside, there is a large amount of water vapor in the air. Dry and damaged hair that is free of products aka porous, thirsty tresses (read more about porosity for detailed information) will naturally seek to absorb the moisture in the air. However, taking in such a large amount of moisture will make your hair full … to the point of swelling and lifting the cuticle layer (the outer layer of hair). This will create frizzy and tangled hair.
Now, if you have a humectant in your thirsty tresses, this will only exasperate the problem. Your hair will become soggy, sticky, and poofy all at once! Recalling a few instances?
What’s The Impact of Low Humidity?
When the humidity is minimal, as seen on most dry, winter days, there isn’t a lot of moisture in the air. If your hair is styled with a product that contains humectants, these items will either:
Hang onto the moisture in your hair and prevent it from evaporating. This may or may not prove to be successful. Your best bet is to stick with moisturizing products, like leave-in conditioners.
Remove moisture from your hair’s cortex and send it into the air. Remember that thing about attraction? Your hair will do this because it so kindly believes that the air needs the moisture, of course. Unfortunately, this will also dry out your hair.
What Are Some Examples of Humectants?
Before you use any product, you should read the ingredients to see whether or not humectants are included. This will help you to better prep your hair for the current humidity levels. In other words, you’ll say “aha!” whenever your hair decides to rise up and become a frizzilicious ball on your head.
Just so you have a heads up, here are a few popular humectants found in hair care products:
Agave Nectar
Aloe Vera Gel
Fructose
Glycerin
Honey
Hydrolyzed silk protein
Panthenol
Now that you’ve got it down, are you ready to take on humidity with humectants? Wham! Bang! Zing!
Now, I’ve been praising the miracles of moisturizing natural hair with leave-in conditioners and sealing the cuticle layer (the outermost layer of hair) with an oil or butter. Now, I’m throwing a monkey wrench into the mix. Uh, huh. This one must be explained since it affects us all: porosity.
Huh? Confused? I don’t blame ya! I heard sprinkles of information about porosity for a while now but usually covered my ears and clicked next on my screen. I thought it all sounded too scientific for me.
Guess what? I caved (hangs head down) because I found out that we actually need to know this one. Grab a pencil and pad … er, um … an iPad? Let me give you a quick and painless explanation of porosity and its affect on natural hair.
Porosity
Porosity is the measurement of your hair’s ability to absorb moisture. Simple. Your hair’s cuticle layer (the outermost layer) is key to porosity levels. When the cuticle is closed, it lays flat and moisture cannot escape or enter the hair shaft. This often results in moisture being sealed into your hair. However, your natural hair may be too porous, not enough, or juuuust right. Hang in there Goldilocks, let me explain.
Normal Porosity
This one’s easy. Natural, black hair easily retains moisture if your porosity is normal. The cuticle layer will open or close based on normal activities and products, but the actual, shingled layer is healthy and intact.
Low Porosity
If your hair has low porosity, it will have trouble opening up due to its overly compact cuticle layer. With this firm barrier, your hair will have difficulty absorbing moisture/water and allowing it to escape. As a result, hair will take longer to absorb products, leaving it dry. It will also be susceptible to product build up.
Needs: A lot of moisture. To open up the cuticle, try steamers, hot oil treatments, and products that are a little more alkaline/have a higher pH level. Add moisture to your hair while it’s damp, before the cuticle layer closes up again.
Need to avoid: Products and techniques that further seal the cuticle, including protein treatments, silicones, and mineral oil.
High Porosity
If your hair has high porosity, it’s a little too friendly, as the cuticle layer remains too open! It will let moisture in and out of your hair very easily, resulting in dry hair. If your hair is very porous, this is often the result of damaged cuticles through excessive direct heat or rough styling. There is no way to repair damaged hair. However, there are a couple of things that can help.
Needs: Oils, butters, apple cider vinegar rinses, cold water rinses, and protein treatments to seal the cuticle layer. Each will temporarily fill in breaks within the cuticle. Products with low pH level (like aloe vera juice) also help.
Needs to avoid: sulfates, direct heat, and harsh chemicals.
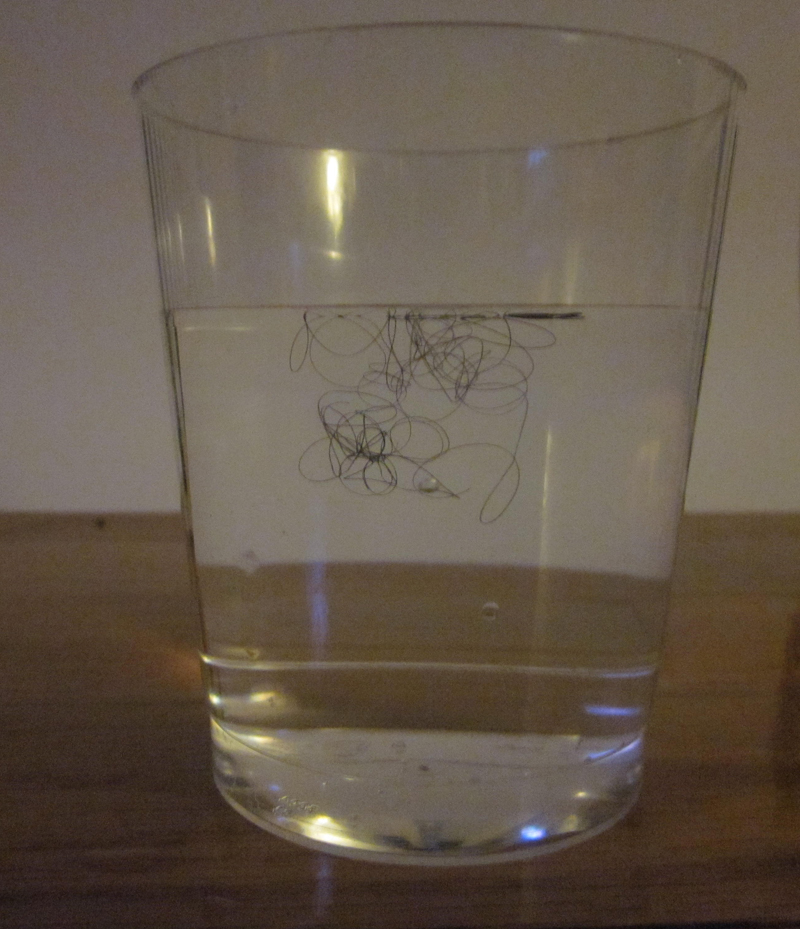
How can you determine your hair’s porosity? Try the porosity/float test.
Porosity Test
Grab a strand(s) of hair from your comb or brush and drop it into a cup of water.
If your hair floats, you have low porosity. The strand(s) stay at the top since it has difficulty absorbing moisture.
If your hair quickly sinks, you have high porosity. It is taking in water fast!
If your hair hovers somewhere in the middle, it has normal porosity.
There have been mixed feelings by curlies who have taken this test. Some say that hair has oil on it, so your strand will most likely float. Others have found this to reflect how their hair actually behaves. Junk science?? Hmmm. It couldn’t hurt to try the test or any of these remedies and see.
By the way, I tried the test and my hair floated (see image below), so I apparently have low porosity as well … Hmmm. I’ll keep this in mind as I continue on my hair journey. You should as well. You never know if these remedies will be beneficial to you.
Have you taken the porosity test? Has this helped you with your hair routine and health?
My Curly Mane underwent the Porosity/Float Test. Photo by Nay.
A wise woman recognizes when her life is out of balance and summons the courage to act to correct it; she knows the meaning of true generosity. Happiness is the reward for a life lived in harmony, with courage and grace.” ~ Suze Orman
My Curly Mane attempts to balance its pH level. Art by Nay.
Let me guess. You just read this title and are now thinking: Here you go again with more scientificy stuff! Calm down. I’m not trapped here in a lab … (quickly takes off white coat and quietly places beakers in the cabinet). Just think of it as me giving you quick lessons for the week. Sit back and relax. Ready for this one? It’s all about natural hair’s pH balance.
First let’s revisit our hair’s structure. As you may already know, the cuticle layer is the outermost, shingle-like layer of hair made of keratin. It protects the cortex aka your hair’s inner layer that provides strength, texture, and color. It also surrounds the medulla, the innermost layer of the hair that is present in coarse hair textures. When closed, the cuticle seals moisture into hair, as it should.
According to Dr. Neil Persadsingh of The Hair in Black Women, “Soft and shiny hair depends on a smooth and even overlap of the scales on the cuticle.”
The Potential of Hydrogen (pH) in the products you use can affect whether or not your cuticle layer is properly sealed.
A typical pH strip
Alkaline Products
You can open the cuticle of your natural hair through heat or by using alkaline products (pH of 8-14). Note: Highly alkaline products open the cuticle too far open, which will make moisture leave your hair and cause breakage.
Acidic Products
You can close your tresses’ cuticle layer through acidic products (pH of 8-14).These productswill leave your hair soft and flexible for a longer period of time. Note: Products that are too acidic can also damage hair.
Ideally
Products that are pH balanced have a pH of 7. However, you want to close the cuticle by using slightly acidic products (pH of 4.5-5.5) on hair. Acidic products are similar to hair’s natural moisturize, sebum. Aloe vera juice (pH of 4) or aloe vera gel (pH of 7) works wonders since they can balance hair’s pH.
Got it down? It is a bit tricky to wrap your head around. To help, try testing the pH levels of a few of your products. You can purchase pH strips from your local beauty supply store. Before doing so, you’ll need to determine your hair’s porosity, since this also needs to be taken into consideration.
Now, I’ve made a mental note to pick up a pH strip during my next hair haul. I’ll keep you posted on how this works as I test it out on a few natural hair care products.
Have you noticed all the ombré hairstyles and other trendy color effects that ladies have been sporting? Well, it goes without saying that summer is the perfect time to experiment with these and other colorful looks. If you’re like me, you love, love color but want to avoid all the drawbacks of commercial hair dyes.
What drawbacks, you ask? While the leading commercial hair dye companies provide a variety of color options, hair colorants can change hair’s inner structure and dry it out, especially if bleaching is involved. Frequent coloring can lead to damage (say bye bye!) and/or split ends (snip, snip!). Of course, you can always skip the bleach if you are seeking darker shades.
Even if you do, rumor has it that hair dyes may be connected to cancer causing agents. According to the National Cancer Institute, early hair dye formulations (before 1980) contained cancer causing chemicals. They have since been removed from most brands’ ingredients. However, few studies have been published since then on hair dyes’ link to certain cancers.
Not to mention, pregnant women are advised to avoid coloring since small amounts of the dye penetrate the skin upon use. This may or may not harm a developing baby, although research claims that it does not pose a significant threat.
Risky? Hmmmm maybe.
If you want to switch up your look sans chemicals, you’re in luck. I’ve got five ways that you change your natural hair color by dyeing it … naturally!
1. Cassia
Cassia Obovata is a plant that contains a golden-yellow dye molecule. When used, color is safely deposited on hair’s surface layer as it conditions hair.
I’ve always wanted to try this one. I’m adding it to my to-try list!
Pros: Cassia will permanently turn blond or gray hair a golden color. It also makes hair shiny, healthy, and strong, so it is often used as a conditioning treatment for afro textured hair.
Cons (maybe): You most likely will not notice a difference on darker hair tones. Some people have experienced a loosening effect on their curls, which may or may not be desired.
Directions: You can mix cassia with conditioner and honey, and apply this mix to your hair. For all the deets, visit hennaforhair.com.
2. Coffee
A mean brew works wonders for all-nighters … and for hair! Coffee is great for staining natural hair. It applies color on the surface level of strands, so the results tend to be temporary for most people.
(whips out pen; adds coffee to the list)
Pros: Coffee gives dark hair reddish-brown highlights, more akin to a rinse. Some people have found that coffee darkens their henna results (see below) when added to their mix.
Cons: It won’t provide intense color. The results may be subtle on darker colored hair. It requires repeated weekly applications for best results.
Directions: Mix 1/2 cup of your favorite conditioner with 1/4 cup of instant coffee granules. Add 1/4 cup of coffee or espresso into the mix and stir. Apply the mixture and cover your hair with a cap. Let the mix sit on your hair for an hour. Rinse with cool water and condition to counteract coffee’s acidity.
3. Henna
Henna, a natural colorant which is derived from a flowering plant, has been used throughout centuries for dying skin and hair. It is used by many African-American women with natural hair since it can strengthen our fragile hair type. It is also safer than commercial hair dyes, since color is deposited on hair’s surface layer as opposed to the cortex. Henna’s popularity is evident by the numerous natural hair care forums, communities, and Websites centered on the topic.
Why, oh, why did I not know about henna back in my multi hair coloring days??
Pros: This natural colorant typically turns hair a shade of red, depending on the person’s original hair color. It also adds sheen to hair and can reduce frizz and dandruff.
Cons (maybe): Henna can loosen curl patterns and thicken natural hair, and the color results can be unpredictable. The application process can be a bit intense, since henna must be left on hair for several hours in order to permeate the hair shaft. It can also easily stain materials during the application process.
Directions: This can vary. Lots of curlies have come up with their own formulations. Curly Nikki is a fan of henna and has gotten great results. You can also find tips at hennaforhair.com.
4. Honey
Not only does honey work wonders for colds, but it also conditions and bleaches hair naturally. Honey slowly releases hydrogen peroxide, which is used to lighten hair. With honey, you’ll get results that are a shade lighter than your original color. Raw (unprocessed) honey is reported to work best since it has more hydrogen peroxide. Honey is also a humectant, so it pulls moisture into hair.
I have tried this one, and it did make my hair very soft! Color? I only tried in on occasion, not enough to see a difference.
Pros: Natural highlights and soft, shiny hair.
Cons: Honey lightens hair over time. Multiple applications (at least three) are needed to produce results. It is very sticky if used alone, so a mix is recommended.
Directions: Mix 5 tbsp of honey and 1 cup of yogurt together to make a non-sticky paste. This combo also makes a wicked deep conditioner, especially if combined with oil. Apply the paste and leave it on your hair for at least 2 hours.
5. Lemon Juice
Ever tried Sun-in back in the day? I did, and it worked, mostly because it contains lemon juice and hydrogen peroxide. If you want to skip all the additional chemicals, just try this route. Lemon juice will gradually lighten your natural hair due to the citric acid it contains.
Pros: Lemon juice brings out natural highlights, causing black and dark brown hair to take on a reddish hue. Brown hair will become light brown, and blonds will have golden highlights.
Cons: Lemon juice’s acidic properties can make it drying. Condition, condition, condition!
Directions: Combine 3 tbsp. lemon juice with 2 cups water. Add conditioner for extra moisture. Use a spray bottle or hands to apply the mix. You’ll need heat to activate it. Sit in the sun for 2 hours or under a hard hat dryer.
Any of these natural hair dyes can change your hair’s color, and some of these ingredients can even be found easily in your kitchen. Most importantly, you’ll be able to update your look without ruining your curly mane.
Hard work spotlights the character of people: some turn up their sleeves, some turn up their noses, and some don’t turn up at all.” ~ Sam Ewing
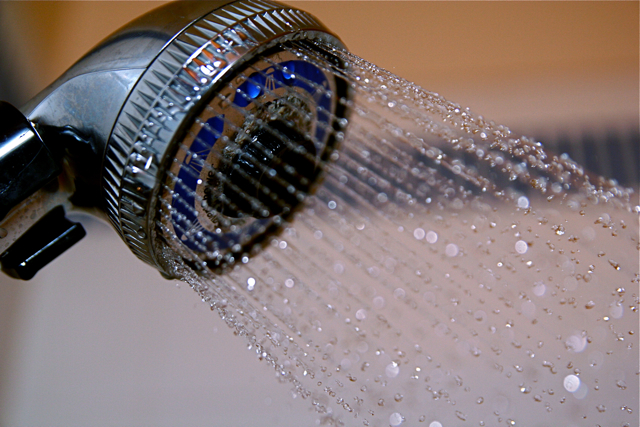
It was like some strange unsolved mystery. Each and every time I stepped into the shower at my SO’s house, the water gently ran through my hair like silk. I only had to use minimal product to produce a lather, and I could detangle my natural hair practically with just water. Yes, with just water! After styling, I got the best hair day ever!
When I flashed forward a few days and repeated the process at home, my hair was just … average. What was going on? Well, after repeating these cycles, I came to the conclusion. Dum, dum, duuuum! Good ol’ H2O.
Water can have a major impact on your products’ effectiveness as well as on your hair, particularly naturally curly hair. These results are often dependent on whether or not your water is hard or soft. Yes, we’re still talking about water here. Hard water is often known as containing larger amounts of minerals than its softer version. This mineral content varies based on your location and how the water is purified and processed. Minerals also have the potential of building up on natural hair, thereby drying it out.
Telltale Signs That Your Water Is Hard
NaturallyCurly lists a few telltale signs to know whether your water is on the hard side. The effects of hard water on natural hair include: “Cloudy, spotty dishes coming out of the dishwasher; diminished performance of coffeemakers; and clogged or broken pipes and washing machines with an unpleasant odor that don’t work properly and turn clothes and towels dingy grey or a rust-tinged color.” Sounds familiar?
Spotting Soft Water
Unlike hard water, soft water has many benefits for afro hair. It has zero-to-minimal amounts of magnesium and calcium. “It can be soothing to bathe in, but rinsing with it will make you feel like you still have a layer of soap on your skin,” according to Livestrong.
When Faced With Hard Knocks
There are a couple of things you can do to alleviate or eliminate the effects of hard water on your curly mane.
1. Swap out your regular showerhead and replace it with ashowerhead water filter. Just like drinking water filters, these showerheads filter out minerals and other substances, thereby softening your water.
I did this with my showerhead at home and noticed a slight improvement. Word for the wise: remember to replace your showerhead filter as needed. It’s easy to forget! I can’t remember the brand I used, but I purchased it from Lowe’s. You can also find them at hardware stores.
However, Aquasana’s showerhead filter is known as one of the best water softeners for African-American hair. It has consistently strong reviews and cost approximately $70. Aquasana is not the most aesthetically pleasing tool, but it’s known to be effective. According to the company, it “removes harmful synthetic chemicals and chlorine in your water to give you softer skin and shinier hair for the cleanest, healthiest showering experience.”
If you want to really improve your water quality and make it truly softer, install a whole house water filter system. These systems claim to remove iron and range in price from $50 to $1,000.
2. Use a chelating shampoo to remove mineral buildup on your hair. These are the best shampoos for hard water. They contain a key ingredient—ethylenediamine tetraacetic acid (EDTA), which “were developed to counteract the effects of hard water and heavy metal ions in the manufacture of textiles. These metal chelators are widely used in cosmetics and personal care products, in food, and in medicines. By binding with metal ions, these ingredients prevent the metals from being deposited onto the hair, scalp and skin,” according to cosmeticsinfo.org.
Chelating shampoos are pretty harsh and will strip your hair of moisture. Be sure to follow them with a moisturizing conditioner like Hello Hydration and use them no more than every other week, if needed.
I keep hearing rave reviews about Joico K-PAK Chelating Shampoo. “This triple-action chelating shampoo is an intense clarifying shampoo that cleanses the hair, removes mineral deposits and styling product buildup,” according to its package. This shampoo costs approximately $14 and can be found at your local Walgreens, or you can purchase it through my link.
3. According to a couple of hair forums, coconut and argan oils can chelate iron and copper, once again preventing your hair from losing moisture. Not to mention that applying oils to your curly mane also has several benefits.
Into DIY methods? Many curlies have found success trying the following rinses.
Club soda rinses are effective and should be rinsed out of your hair once the fizzing stops. Not into using soda? Heck, bottoms up!
Apple cider vinegar (ACV) rinses remove buildup, restores your pH balance, treats dandruff, and closes the cuticle. Just be careful not to overdo it, as ACV is highly acidic, which can actually damage your hair with excessive use. On its own, ACV smells … deadly, but the smell does fade once washed out of your hair. Combine 1tbsp of ACV to every cup of distilled water. After shampooing, apply the rise. Wait a few seconds before rinsing with cold water, which will further help to seal the cuticles of your hair. Want a bit more moisturizing brew? Add honey and/or aloe vera gel.
Water and baking soda rinses cleanse and remove buildup from the hair. Baking soda aka sodium bicarbonate works great as a replacement for shampoos. Combine 2 tablespoons of Baking Soda with a cup of water, pour the mix onto your hair, wait a few minutes, and rinse. You’re good to go!
Some curlies have tried baking soda washes followed by vinegar rinses. Just be careful. Too much of anything is overkill, especially for your natural hair. For me, I’ll seize each and every moment to use soft water as I get it!


Recent Comments