There may be affiliate links in this post. If you click on the link, I will receive a commission at no extra cost to you. Thank you for the support! All opinions on this post are my own.
Attention dear friends. Recently I celebrated my birthday! Yes, curlies. My curly mane and I are literally older … and hopefully wiser! To celebrate this milestone (no, I won’t reveal the numbers as yet … gulp!), I straightened my mane! Believe it or not; I actually departed from curls to sport straightened locks. First, I wanted to mix it up for a few, celebratory days. Second, I wanted to conduct a length check.
You see. For about a year, I swore that my hair wasn’t budging past near mid-back/bra-strap length, but I now know that my hair needs less direct heat aka flat ironing in order for it to thrive. At the start of the summer, I made a commitment to reduce the amount of time in which I’d straighten my hair and experiment more with my natural hair. In doing so, my hair has gotten even healthier than before and longer!
That being said, it was time to straighten my hair the safer way—roller settting and then lightly flat ironing. Here are a few steps (as well as grown lady tips!) in which you can follow to capture this look.
Tools:
- Clarifying or Moisturizing Shampoo
- Conditioner
- Leave-in conditioner (I use Silicon Mix Intensive Leave in Hair Shine and Conditioner since the silicones it contains help to trap moisture into the hair and prevent frizz )
- Oil (I love my Vatika Oil mix)
- Regular tooth comb (not wide or fine, just right and easy to use)
- Snap-on, hard, magnetic rollers aka rolos 🙂 You can also use flexi rods if this is easier.
- Soft rollers covered in satin
- Spray Bottle (fill with water)
- Hard hat dryer (I have a Pibbs but Belson Elite Ionic Tourmaline Rollabout Dryer works well)
- Setting lotion = optional. I don’t use it, but if you want more hold then use this.
- Heat protectant spray (always recommended, but I tend to skip this in favor of an oil or butter)
- Flat iron (I use a Maxiglide)
Steps
- Start with a clean slate. Wash and condition your curly mane as you normally do. I like to clarify my hair, so it is completely clear of other products, particularly those that work with my natural curls but not with straight tresses.
- Apply leave-in conditioner. I tend to add a lot of product to the ends of my hair, since I will be using a flat iron, and I don’t want to dry out my ends. Calling all bandits! Split ends will rob you of length retention.
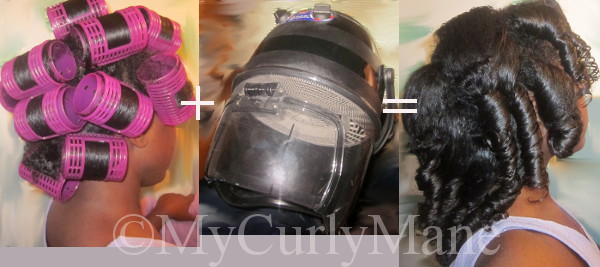
- Keep hard rollers (for drying under the hard hat) at your side, and section your hair from the back to the front of your head. Create sections at the appropriate size of each hard roller. If your section is too large for the roller, your hair will take much longer to dry.
- Comb out each section of hair, spritz to keep it moist, and roll it with a roller. Apply tension to your hair as you roll, so your hair is as straight as possible. If you want more hold, spritz setting lotion onto the hair as you roll it. Warning: I am absolutely the worst at roller setting! If you’re in this club, it’s okay. You want to focus on getting the hair smooth and simply roll it as close to the scalp as possible. When you flat iron, it will work out the kinks. I also do not create neat rows. I haven’t gotten this down, so I roll my hair in the same sections I use for braid outs.
- After roller setting your entire head of hair, sit under a hard hat dryer for at least 30 minutes. Please gauge this according to your hair length and drying needs. Your hair must be completely dry to avoid frizz.
- Undo your rollers. You’ll notice that your roots may still be poofy. Ah, our curly manes win again! Once again this is okay. See my photo. My hair length may not be as kinky curly as it was originally, but my roots are still poofy. Once again, no need to fret.
- Apply oil all over your hair. This works as a heat protectant and adds sheen.
- Dust off your flat iron. My Maxiglide felt a little foreign in my hands. It took me a minute to remember how to use it! Anyhoo, grab your flat iron and straightened your hair, working in small sections from the back to the front of your head. I apply a minimal amount of heat needed to straighten it. I also like to bump (curl) the ends for body.
That’s it! You now have straight hair!
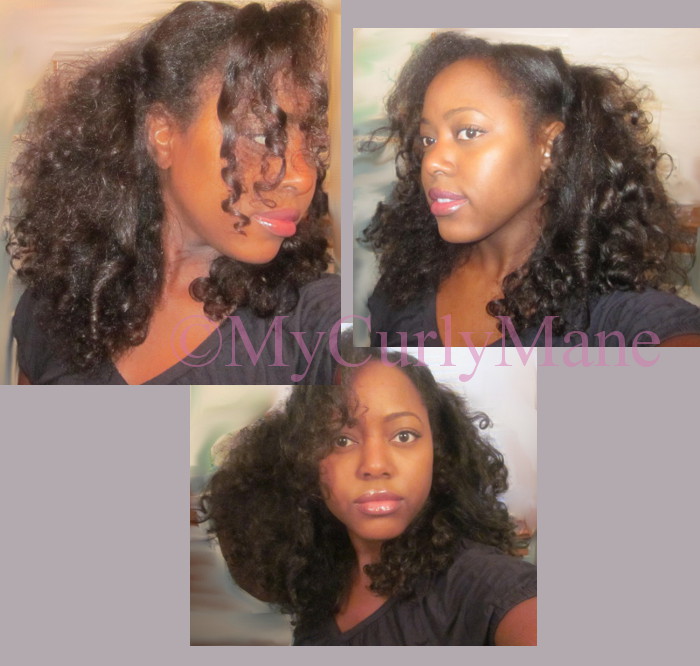
Optional: Do you want beachy, bouncy curls? If so, as you flat iron each section, roll it with a soft, satin roller. Leave the soft rollers in your hair for at least an hour. When removed, you will have large, curls and waves.
Runway Styling & Nighttime Maintenance
While I like to have straight hair for the first day. Each day afterwards, I like to rock that Victoria’s Secret-esk, beachy look. Lol! This protects my ends and doesn’t require flat irons to maintain the look. To capture this look, I begin by oiling my entire hair, particularly the ends, each night. Afterwards, I use the soft, satin rollers to roll my hair. I apply a satin cap over the rollers for extra protection and to keep the positioning of the rollers. Off to bed you go! In the morning, remove all and voilá! Repeat each night for a hot look and simple, safe upkeep.
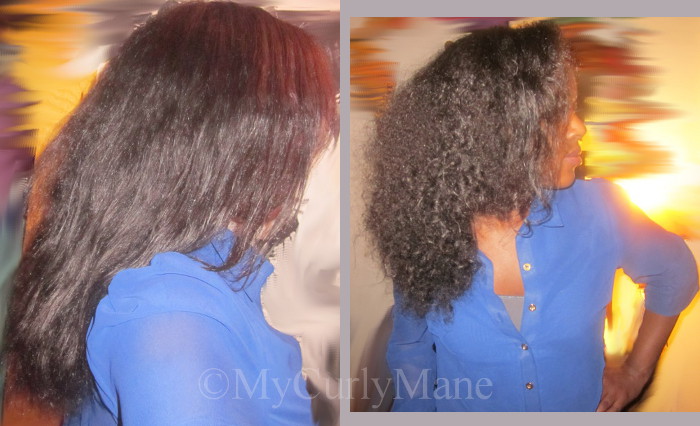
On the first day, my straightened mane easily reverted (on right). This tends to happen when natural hair hasn’t been straightened for a while. I applied a minimal amount of heat that night and roller set my hair with soft, satin rollers.
Grown Lady Lessons
As I mentioned prior, the clock is ticking and tocking. Sigh. You may have guessed it. I am one of those gals who hit a birthday and had a bit of the blues followed by the highs of all the lessons learned. I am blessed to blow out another candle, and in doing so, want to share a few lessons with you. As always, each one teach one.
On Hair (of course!) …
- Slow and steady wins the race. Chances are you will not figure out your hair overnight … and that’s okay! I’m still discovering my hair’s capabilities.
- The best manes are the result of gentle care and healthy hair. These tips are underrated but produce the best results. Healthy hair that’s treated kindly will always look good.
- It’s okay to keep the same style until you master your hair and other looks. Don’t feel pressured to have the same results as other curlies. Focus on your own progress. Remember #1: slow and steady wins the race!
On Life …
- It’s okay to be different. It’s everyone else’s problem if you do not fit into a mold. Seize the opportunity to enlighten them. If they don’t get it, keep it moving!
- Not everyone will like you. Ugh! “But why?” you say. “I am so kind and God-fearing.” Sadly, even the best of us will get shunned or bullied once in our lives. I know. It isn’t right. It’s just human nature. You just have to remember to be above it. Once again, it’s their problem. Keep it moving!
- There’s nothing better than being kind to yourself. Woooah there, lioness! Go easy. Don’t put so much pressure on yourself. Even if you believe you haven’t accomplished as much as you’d like to by your age, note the many lessons learned (I hope!), adventures undertaken (even the minis), and plain ol’ fashioned growing up that you’ve done. Be kind to yourself. You deserve it. If you’ve had a b’day or you’re approaching one, happy you day to you!
© 2012 – 2016, https:. All rights reserved.


Recent Comments