by Nay | Nov 18, 2012 | Tools
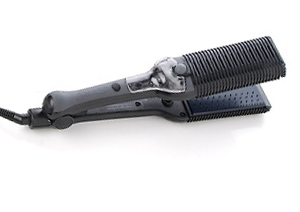
Above: A Maxiglide XP
Do you remember those infomercials with that clever straightener that claimed to steam as opposed to burning hair while straightening—without blow drying? Better yet, do you remember that those same infomercials featured a curlie with thiiiick, long natural hair, which was steamed straight right before our very eyes? Doesn’t ring a bell? Well, those incessant commercials were for the Maxiglide.
After watching them a million times, I was convinced to purchase a model from the Home Shopping Network (HSN). At first, I didn’t like how its pins (used to separate strands as you iron) snagged my hair and caused split ends, so I put it away and considered it a loss. I waited too long to return it and simply forgot about it. This was during my prime product junkism, and if something didn’t work on demand, I was on to the next!
That was until I re-discovered the Maxiglide a year later thanks to vlogger LeobodyC5 from YouTube. If you’ve seen LeobodyC5 aka big sister in my head, you’ll know that she has amazing, long, natural hair. Trust me. It’s good stuff! After seeing her results, I dug into my closet and dusted off the Maxiglide. I patiently and carefully ran the iron through my hair and loved the results.
The Maxiglide made my hair big, fluffy, and light. It had crazy body and easily produced waves and curls from taking down high buns or roller setting my hair overnight. Even in high humid weather, my hair would revert into bountiful curls. It was also easy to use, as I’d braid out my hair at night and straighten it in the morning. Roller sets prior to straightening always produced the best results.
Now here’s the problem. I used the Maxiglide on a weekly basis. Surprisingly, I was able to return to healthy natural curls, but I also got a lot of split ends. This led to regular trims and barely any length retention due to frequent cuts. All in all it’s a good straightener once you get the technique down and use it on occasion.
Model Drama
In my letter below, you’ll notice that I had a complaint about the changes in Maxiglide’s models. In the last four years or so, the company behind Maxiglide, Maxius Beauty, came out with a cheaper model—the Maxiglide Xpress—which began to replace the Maxiglide MP (smaller sized model) and Maxiglide XP (larger sized model that I preferred). While my XP was working, I wanted to have a backup model (MP or XP) to travel with. Unfortunately, all models are apparently sold out everywhere. It’s not even available on Maxius Beauty’s Website, so I contacted the company. Yeah, I did it! I rang the bell! … Okay, I gently knocked on the door. The conversation went (via email) as stated below.
Sent on April 19, 2012 (I was serious, but a bit silly. Can’t help it!):

Reply from Maxiglide Customer Service on April 20, 2012, following a previous email exchange with them. This response was after I clarified my situation further. Maxius Beauty informed me in their previous email (not included below) that they are launching a new straightener called the Sonicglide. Personal details/name of a company contact was removed for privacy.:

The Low down
I was supposed to track down a copy of my receipt from the HSN (where I once ordered my models from). However, I never got around to doing so, so I can’t complain. I am eagerly awaiting the launch of the Sonicglide. It was supposed to make its debut at the end of May, but it’s nowhere to be found.
As I mentioned in my email, I’m just not completely convinced yet to purchase an InStyler. I’ve read reviews that have made me cautious. I’ve also eyeballed it a few times at Target but walked away from it … yes, I actually said no to purchasing a hair item!
While I patiently await the Sonicglide’s arrival (taps nails impatiently on the table), do you think I should stalk follow up with Maxius Beauty, or have I maxed out this discussion (and use of the word max—ha!)? Let me know your thoughts, and I’ll proceed as you wish.
If you’ve used the Maxiglide or InStyler, please let me know your experience. As you know, comments are always welcomed!
UPDATED (11-21-12): Ding! Ding! I received a message from Masood Max, the creator of the Maxiglide. Apparently, a limited amount of Maxiglides will be available for purchase through Maxius Beauty’s Website, starting Black Friday. Hopefully, the Maxiglide XP will be available. I give Max kudos for following up with us fans. Once again, let me know if you’re able to snag an XP and try it.
UPDATED (1-31-13): Gasp! The Sonicglide is here! You can purchase one at ShopNBC. Thank you, Pooneh, who informed us in the comments below. The only thing that surprises me is that The Sonicglide looks and works like the Maxiglide … except that it vibrates? Hmm … intrigued. I thought this would be a completely different model. What’s funny is that the new promotional video showcases the original hair model (from the older videos), who has a great curly mane. If anyone makes a purchase, please let me know. I may have to snag one for myself, ur, I mean my sister. 😉
by Nay | Nov 17, 2012 | Life Lessons, Mane Styles, Tips, Uncategorized
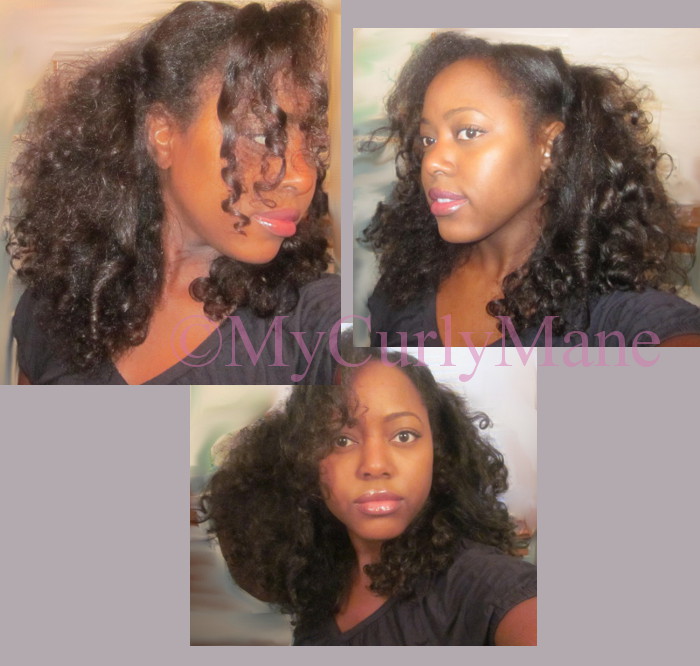
My natural hair was straightened and curled. This look lasts for 3-5 days (for my mane).
Attention dear friends. Recently I celebrated my birthday! Yes, curlies. My curly mane and I are literally older … and hopefully wiser! To celebrate this milestone (no, I won’t reveal the numbers as yet … gulp!), I straightened my mane! Believe it or not; I actually departed from curls to sport straightened locks. First, I wanted to mix it up for a few, celebratory days. Second, I wanted to conduct a length check.
You see. For about a year, I swore that my hair wasn’t budging past near mid-back/bra-strap length, but I now know that my hair needs less direct heat aka flat ironing in order for it to thrive. At the start of the summer, I made a commitment to reduce the amount of time in which I’d straighten my hair and experiment more with my natural hair. In doing so, my hair has gotten even healthier than before and longer!
That being said, it was time to straighten my hair the safer way—roller settting and then lightly flat ironing. Here are a few steps (as well as grown lady tips!) in which you can follow to capture this look.
Tools:
- Clarifying or Moisturizing Shampoo
- Conditioner
- Leave-in conditioner (I use Silicon Mix Intensive Leave in Hair Shine and Conditioner since the silicones it contains help to trap moisture into the hair and prevent frizz )
- Oil (I love my Vatika Oil mix)
- Regular tooth comb (not wide or fine, just right and easy to use)
- Snap-on, hard, magnetic rollers aka rolos 🙂 You can also use flexi rods if this is easier.
- Soft rollers covered in satin
- Spray Bottle (fill with water)
- Hard hat dryer (I have a Pibbs but Belson Elite Ionic Tourmaline Rollabout Dryer works well)
- Setting lotion = optional. I don’t use it, but if you want more hold then use this.
- Heat protectant spray (always recommended, but I tend to skip this in favor of an oil or butter)
- Flat iron (I use a Maxiglide)

Tools of the trade and steps needed in order to roller set natural hair.
Steps
- Start with a clean slate. Wash and condition your curly mane as you normally do. I like to clarify my hair, so it is completely clear of other products, particularly those that work with my natural curls but not with straight tresses.
- Apply leave-in conditioner. I tend to add a lot of product to the ends of my hair, since I will be using a flat iron, and I don’t want to dry out my ends. Calling all bandits! Split ends will rob you of length retention.
- Keep hard rollers (for drying under the hard hat) at your side, and section your hair from the back to the front of your head. Create sections at the appropriate size of each hard roller. If your section is too large for the roller, your hair will take much longer to dry.
- Comb out each section of hair, spritz to keep it moist, and roll it with a roller. Apply tension to your hair as you roll, so your hair is as straight as possible. If you want more hold, spritz setting lotion onto the hair as you roll it. Warning: I am absolutely the worst at roller setting! If you’re in this club, it’s okay. You want to focus on getting the hair smooth and simply roll it as close to the scalp as possible. When you flat iron, it will work out the kinks. I also do not create neat rows. I haven’t gotten this down, so I roll my hair in the same sections I use for braid outs.
- After roller setting your entire head of hair, sit under a hard hat dryer for at least 30 minutes. Please gauge this according to your hair length and drying needs. Your hair must be completely dry to avoid frizz.
- Undo your rollers. You’ll notice that your roots may still be poofy. Ah, our curly manes win again! Once again this is okay. See my photo. My hair length may not be as kinky curly as it was originally, but my roots are still poofy. Once again, no need to fret.
- Apply oil all over your hair. This works as a heat protectant and adds sheen.
- Dust off your flat iron. My Maxiglide felt a little foreign in my hands. It took me a minute to remember how to use it! Anyhoo, grab your flat iron and straightened your hair, working in small sections from the back to the front of your head. I apply a minimal amount of heat needed to straighten it. I also like to bump (curl) the ends for body.

That’s it! You now have straight hair!
Optional: Do you want beachy, bouncy curls? If so, as you flat iron each section, roll it with a soft, satin roller. Leave the soft rollers in your hair for at least an hour. When removed, you will have large, curls and waves.
Runway Styling & Nighttime Maintenance
While I like to have straight hair for the first day. Each day afterwards, I like to rock that Victoria’s Secret-esk, beachy look. Lol! This protects my ends and doesn’t require flat irons to maintain the look. To capture this look, I begin by oiling my entire hair, particularly the ends, each night. Afterwards, I use the soft, satin rollers to roll my hair. I apply a satin cap over the rollers for extra protection and to keep the positioning of the rollers. Off to bed you go! In the morning, remove all and voilá! Repeat each night for a hot look and simple, safe upkeep.

On the first day, my straightened mane easily reverted (on right). This tends to happen when natural hair hasn’t been straightened for a while. I applied a minimal amount of heat that night and roller set my hair with soft, satin rollers.
Grown Lady Lessons
As I mentioned prior, the clock is ticking and tocking. Sigh. You may have guessed it. I am one of those gals who hit a birthday and had a bit of the blues followed by the highs of all the lessons learned. I am blessed to blow out another candle, and in doing so, want to share a few lessons with you. As always, each one teach one.
On Hair (of course!) …
- Slow and steady wins the race. Chances are you will not figure out your hair overnight … and that’s okay! I’m still discovering my hair’s capabilities.
- The best manes are the result of gentle care and healthy hair. These tips are underrated but produce the best results. Healthy hair that’s treated kindly will always look good.
- It’s okay to keep the same style until you master your hair and other looks. Don’t feel pressured to have the same results as other curlies. Focus on your own progress. Remember #1: slow and steady wins the race!
On Life …
- It’s okay to be different. It’s everyone else’s problem if you do not fit into a mold. Seize the opportunity to enlighten them. If they don’t get it, keep it moving!
- Not everyone will like you. Ugh! “But why?” you say. “I am so kind and God-fearing.” Sadly, even the best of us will get shunned or bullied once in our lives. I know. It isn’t right. It’s just human nature. You just have to remember to be above it. Once again, it’s their problem. Keep it moving!
- There’s nothing better than being kind to yourself. Woooah there, lioness! Go easy. Don’t put so much pressure on yourself. Even if you believe you haven’t accomplished as much as you’d like to by your age, note the many lessons learned (I hope!), adventures undertaken (even the minis), and plain ol’ fashioned growing up that you’ve done. Be kind to yourself. You deserve it. If you’ve had a b’day or you’re approaching one, happy you day to you!
by Nay | Nov 4, 2012 | Hair-raising
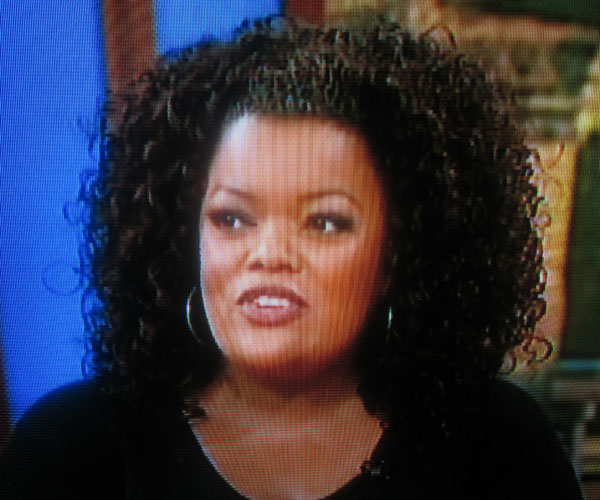
Yvette Nicole Brown discusses her use of magic hair on the Wendy Williams Show.
On the NBC sitcom, Community, actress and comedian Yvette Nicole Brown plays Shirley Bennett, a recently divorced mother of three who attends Greendale Community College. While Brown is a celeb and Bennett is a sassy student, they have a single, glaring commonality—natural hair! Thank you to the writers for allowing Brown’s character to sport a curly mane (faux or no)! Thank you Yvette for embracing your textured tresses!
When I heard that Yvette Nicole Brown was going to be featured on the Wendy Williams Show a few weeks ago, I tuned in to check out her hair … of course! To my delight, Wendy sparked a conversation about the topic. Yeesssss! Score! Cool points for Wendy. Here’s how it went:
Wendy Williams: The last time I saw you, it was all natural hair. And I told you, as soon as you start doing a whole lot of TV, and events, and stuff, wigs make it easy. So now what are we doing?
Yvette Nicole Brown: She (apparent reference to stylist) told me to keep some hair in a bag. Now this front is mine. A little bit of mine is springing out everywhere. But this [majority of hair] is somebody else’s. I don’t even know. I don’t know whose, and I don’t care. I just want to personally thank her.
Wendy went on to mention Yvette’s best friend and actress, Sherri Shepherd, who is also a devote wig wearer. In the interview, Wendy seemed clearly team magic hair. Okay. Correction. She is a wig lover with some pretty impressive styles and wigs that she even names. You may have already heard all about her wig head, Shakeetha. LOL! It all makes me thiiiissss close (brings thumb and pointer extremely close together) to wanting to test drive wigs … maybe … just once. This also brings me to the topic of women with natural hair wearing faux hair, specifically wigs.
Yvette Nicole has beautiful natural hair, and to preserve it while undergoing frequent changes for appearances, she wears wigs. Natural hair just won’t hold up to the entertainment industry’s many styling demands. For instance, going from straight to wavy and back again in a 48 hour period.
For us every day ladies, our hair may not have rigorous demands, so a wig may not be a necessity … or is it? Looking back at the times spent straightening my hair and perfecting my natural look for professional occasions, I wonder if it would have been better for my hair if I just wore wigs. I’ve never done so and enjoy styling my hair, so I’ll continue to work with what I have for now. Just remember curlies, even if you are a wiggy, you still need to give gentle care to your natural hair.
Are you a wiggy by day, natural by night? Let us know why you’ve been pulling a quick change and how you maintain your natural hair while wearing wigs.
by Nay | Nov 4, 2012 | Tips, Uncategorized
May it be a light to you in dark places, when all other lights go out.”
~ J.R.R. Tolkien, The Fellowship of the Ring

Washing my curly mane in the sink. No, don’t use the dish washing liquid shown! 🙂
Before she even arrived, Hurricane Sandy was called the perfect storm. Perhaps this is because she was perfectly disastrous. On the east coast, Miss Sandy uprooted many trees, destroyed homes, cars, streets, and left many without electricity, including myself. Our lifestyle definitely went back to basics. With work still a possibility the next day, I needed to have my hair somewhat presentable in the event that I was called into the office. This required a much needed washing of my hair … without hot water!
Those of us with easy access to clean, hot water are veeerrrry lucky. I remember my first experience as a child visiting family in Jamaica and experiencing the culture shock … of my own culture! At that time many places in Jamaica did not have hot water running through the pipes. Today, here in the states, Sandy has contaminated water supplies and left many without access to power and ultimately clean, warm water. I extend my prayers to all whom have been affected by this travesty.
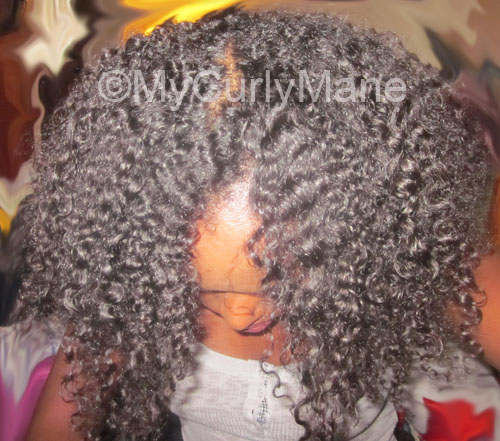
First day results of a braid-out with aloe vera gel.
In the sake of actual necessity and much needed levity, let me share some hair care tips in the event that you’re left without warm water and for some reason or another need to wash your hair. This is simple and maybe common sense, but sometimes, you’re thrown off when comforts are removed. We’re gonna take this back Little House on the Prairie-style! 😉
Tools:
- Kettle
- Large Pot
- Sink or Bathtub (to wash hair in)
- Water (seriously, you’ll need this)
- Gas/electric or solely gas burning stove (seriously!)
- Preferred Moisturizing Shampoo – skip if you’re doing the conditioner only/Curly Girl Method. I used Crème of Nature Argan Oil Moisture and Shine Shampoo.
- Preferred Conditioner – My staple is Herbal Essences Hello Hydration Moisturizing Conditioner.
Steps:
- Pre-poo – Before washing my hair, I applied conditioner onto it, since I recently straightened my curly mane and wanted to restore its moisture balance. You can do this too if you simply want to ensure that your shampoo doesn’t completely strip your hair from oils. I left the conditioner in for about 10 minutes.
- Heat water in a kettle – Gauge the amount based on your curly mane’s needs.
- Place large pot aside, where you can easily grab and use it. You will pour water from the pot onto your hair—not straight from the kettle! Hey, some curlies need a slower pace and heads up. I’m not mad at you!
- Transfer some of the heated water into your pot. You’ll want to leave some water for additional rinsing of your hair.
- Shampoo hair in a sink or bathtub.
- Add cold water to the pot with hot water. The temperature should be comfortable for pouring onto your hair.
- Pour warmed water from the pot onto your hair.
- Condition your hair.
- Transfer more hot water from kettle to the pot and add cold water.
- Pour warmed water from the pot onto your hair.

Second day results of re-braided hair using Beautiful Textures Moisture Butter
Work in this manner (combining water from the kettle and cold water from your sink into the pot) until your hair is clarified. Simple!
Styling:
You can proceed with a wash and go. However, I knew that I wouldn’t be able to stretch and style my hair using a blow dryer (no electricity), as I typically do. If you have time on your hands, here’s what you can do—Braid-outs!
Check out my post on how to get stretched results with Fruit of the Earth 100% Aloe Vera Gel. Of course, you’ll have to skip the steps in which a blow dryer is used. I used aloe vera gel on the first day and Beautiful Textures Moisture Butter Whipped Curl Creme to re-braid my hair on the second day. Details on this butter will be shared in an upcoming post.
I re-braided my hair at night until our hot water returned, saving water and electricity, while gaining time needed to tend to my family. That’s it! Simple lifestyle, easy hair care, many blessings.