by Nay | Sep 15, 2012 | CurlSpotting, Uncategorized
A natural haired beauty works a high top fade, steals scene from Rihanna.
Approximately 6.1 million of you tuned in to watch this year’s MTV Video Music Awards (VMAs) either to catch a glimpse of One Direction, laugh with Kevin Hart, listen to Pink rock out, or watch how the Chris Brown-Rihanna-Drake saga would unfold. However, do you know the true star of the show? Spotted! Two unique manes!
Our first curlie cat walked to the beat of her own drum. I’m not talking about the typical spirally locks that are highlighted in the media. Our natural haired lady took it waaay back to Hammer time! She, whose name I unfortunately don’t know, was one of the night’s models. She was tasked with escorting winners to and from the stage.
She immediately caught my eye when pop star Rihanna accepted her award. Ri Ri looked spectacular, and I was focused on her until … a leggy beauty handed her a VMA. The model’s svelte, sexy frame was complemented by her sparkly dress and … high top fade! Yes, this beauty took the afro to new heights … literally! Her look was signature Grace Jones. I wouldn’t be surprised if experimental Rihanna also made a mental download of her hair and will mirror it as her next look.

This curlie was spotted stealing the show from Taylor Swift.
Just as I was in awe of this feminine fade, out came yet another natural beauty onto the stage. Our second gal was spotted performing as a backup singer for country teen queen Taylor Swift. In fact, she wasn’t in the background. She was performing side by side with the star for the majority of the performance, placing her full-on curly mane on display, on display, on display (okay, enough with The Real Housewives reference). She whipped her curls about, animating the song and easily drawing me in.
Did you see it?? Are you inspired to rock out with these looks? If you’ve always done braid-outs, follow our second curlie and try a wash and go (click here for my 10 steps). If you’re looking for a funky new look, especially if you are big chopping, try our first gal’s ‘do. You can even take it to another level and add colors or designs! A bit too extreme for me, but still a pretty cool look indeed.
Have you tried a fade or similar unique look? Did you steal the show? Feel free to share your story below.
by Nay | Jun 25, 2012 | Mane Styles, Tips
It’s summer time! Woo hoo!
It’s the perfect season to lay out in the sun and usher in your wash-and-go routine. There’s no better way to showcase your curls than through this technique. Not to mention, this basic, natural hairstyle for natural hair can also help some curlies maintain healthy hair and experience growth.

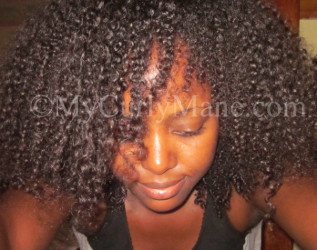
My wash and go results using Hair Rules Kinky Curling Cream
Pros:
This easy hairstyle showcases your natural texture. It creates faster hair growth (for me), keeps your scalp cool and hair clean on hot, sticky days
Cons:
Wet hair (if you air dry), single strand knots (for me, some people do not have this problem), unpredictable results based on how your hair is feeling that day or reacting to the weather, shrinkage (for me)
Please note that the steps provided below work for me. You may want to adjust these wash and go tips to suit your curly mane’s needs.
Before you begin, repeat the following:
I will respect my hair in all its states, even if this style proves to be unsuccessful. I will remain patient and pay attention to its needs, but most importantly, I will continue to love my curly mane.”
Tools:
- Spray bottle (filled with water)
- Hair clips (for sectioning, I use two clips)
- Leave-in conditioner (that works well with your styler and does not produce white balls)
- Styler aka your holding product or gel (some curlies are able to skip this). I used Hair Rules Kinky Curling Cream in these photos.
- Oil (if it works with your styler)
- Blow dryer (Turbo Blow Dryer
 )
)
- Afro Pik
 (optional)
- Diffuser (optional)
- Denman D31 or Denman D41 Volumizing Brush
 (optional)
- Fingers (just kidding!)

Blow drying my mane after washing … so I can go!
Steps:
- Wash your natural hair with a moisturizing shampoo or co-wash. If you use a product that builds up on your hair, please use a clarifying shampoo. Always follow shampoos with a moisturizing conditioner. Key word = moisture!
- Squeeze out excess water and begin working on your damp hair (don’t allow for air drying just yet). This will allow products to easily absorb into your hair shaft. Keep your trusty spray bottle at hand to rewet areas that dry faster.
- Apply a leave-in condition all over hair. Don’t forget to section your hair and smooth the product in as needed. I apply extra conditioner to my ends (to prevent split ends).
- Part hair into small sections, beginning in the back and working your way towards the front of your head. I gather together the large areas that I’m not working on by using a clip.
- Apply styler onto hair in sections, using the rake and smooth method (literally raking and smoothing products for African-American hair or afro textured hair with your fingers). Some curlies prefer to whip out a Denman brush to help their curls pop. I have had hits and misses with this brush, so it’s out of my routine for now. You can also coil stubborn strands around your finger to help achieve a defined look.
- Do not touch!!
- Use a blow dryer to dry your hair, using high heat and speed. It is recommended that you use low heat, but I increase this because my dryer is older and gives off less heat. Point the nozzle down your hair shaft (to prevent frizz) and move it around your hair. Don’t dry one spot for too long, or you will damage your hair. Use a diffuser if preferred. I don’t. For the first 6 minutes, do not touch your hair. It will create frizz. You can gently part sections or shake your head to help reach your scalp area with the dryer (and also separate curls as needed). After 6 minutes, shake hair and use dryer to reach the inner sections of your hair. It takes me approximately 10 minutes of total drying time when using Miss Jessie’s Quick Curls
 or Fantasia IC Polisher Gel. With some other products like Hair Rules Kinky Curling Cream
 , it take me 15-20 minutes. Your drying time will vary depending on your hair length and products.
- Smooth oil onto hair in sections after your hair is about 90% dry. This helps to fight frizz and also aids in de-stiffening stylers.

I like to use a tug-and-stretch method to lengthen curls.
- Blow dry for a few seconds while flipping hair about for volume (literally whipping hair back and forth). You should do this as/if it suits your desired look.
- Tug and stretch sections (about mid length) that you’d like to stretch and briefly blow dry the first 2 inches from your roots (adjust according to your hair length) for a few seconds per section to help elongate your hair. Optional: Use an afro pick to lift and stretch sections you’d like to volumize (typically the top and front of your hair). You will only need to literally pick up the first ½ inch to 1 inch of hair from roots and blow dry this area for a few seconds.
You’re now done with washing and styling. Off you go! Weeeeerk!
Find out how to preserve your curls through nighttime routines and sexy sleeping techniques.