A girl without braids is like a city without bridges.” ~ Roman Payne, Rooftop Soliloquy
Previously, I shared with you the many benefits of aloe vera on hair and my shock and awe at the results of my hair styled with aloe vera gel (AVG). Yes, shock and awe. Well, I didn’t want to leave you hanging, so I continued to use the gel for a full week (how’s that for due diligence?). I even incorporated it into my plaits/braid out routine, a welcomed change from my typical wash and go. The results?
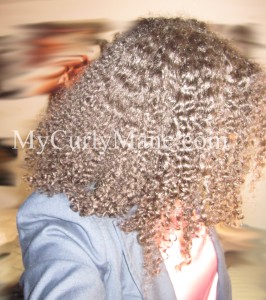
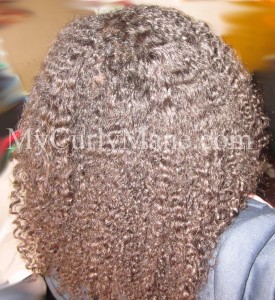
Perfect! I am truly amazed. Aloe vera gel gave me a soft and defined braid out with little shrinkage. Typically, with other products, my hair results wane as the days go on. Not to mention that the product tends to dry out my hair, leave it dull after the first day, and/or leaves a slightly frizzed result. Not with aloe vera gel! I was able to resuscitate my braided out mane each night, getting 2nd, 3rd, and even 4th day hair! I kid you not. I also got some compliments … and confused stares (here she goes again with new hair).
You can achieve this look by following the steps below. You can also use braid outs as a protective style, meaning it will protect your strands from breaking and splitting by hiding and securing your ends (while in braids). This is particularly good for curlies whose hair does not like wash and gos or if your personal preference is for a more elongated curly look.
Tools:
- Spray bottle with water
- Leave-in conditioner (I’m experimenting with Beautiful Textures’ Tangle Taming Leave-in Conditioner and having positive results.)
- Oil/oils of choice (I used my Vatika Oil Mix. You can use plain Dabur Vatika Coconut Hair Oil)
- Aloe vera gel (I used Fruit of the Earth 100% Aloe Vera Gel
)
- 2 rubber bands
- Hair dryer
- Hair clips
First Things First:
1. Work on freshly washed hair. Yes, curlie, wash your mane!
2. Start at the back of your head and work your way towards the front.
3. Part your first section of hair and section off the rest of your hair with a clip. The bigger the section, the larger the curls and waves will be.
4. Layer products in the following order: leave-in conditioner, oil (for sealing in moisture), and aloe vera gel.
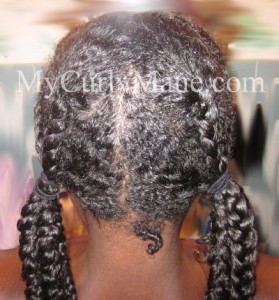
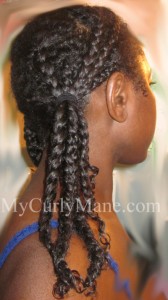
By placing my plaits in ponytails, it helps to stretch my hair. Check out the little wormy curl by my neck. LOL!
5. Braid your hair and twirl the ends around your finger. This will leave a curl at the ends. I applied a little extra conditioner to my ends to add moisture and aid in the twirling action.
6. Continue to braid all over your head. I do approximately 8-10 plaits.
7. You can leave your hair as is, or place your braids in two pony tails (see pic) using rubber bands. I use this method to further stretch my hair. If you like more body at the top of your head (va-voom!), skip the ponytails, as it will pull your hair south as opposed to up and out. I skipped the ponytails for my 2nd day hair results.
8. Let your hair air dry or sit under a hooded dryer. It may be easier to do this routine at night, and let your hair air dry overnight, which is what I did.
9. Once dry, gently unbraid your hair. If you let it dry overnight and it’s still a little wet, gently unbraid your hair and blow dry (not scorch) it. Once dry, I like to use a blow dryer (again) to tug and stretch my hair even more. The blow dryer also helps my products, particularly the oils, absorb into my hair, softening the hair further.
10. Fluff and separate curls as desired in order to hide the parts in your hair. You can also add accessories as desired. I added a black flower (and a little gloss and glam!) on my 2nd day.
For 2nd Day Hair
1. Work in sections again, from the back to the front of your head. You can use the same areas you used before or use new sections. If you’re using a new section, remember to gently separate your hair strands.
2. Lightly spritz sectioned off hair with water.
3. I added more aloe vera gel because I wasn’t sure if I’d get enough definition. You can skip this or go in the opposite direction and add aloe vera gel, oil, and/or more leave-in. This will require some experimentation. Please listen to your hair and its needs.
4. Re-braid hair.
5. Air or blow dry.
6. Unbraid and fluff. You can also briefly blow dry and stretch your hair.
For 3rd Day Hair
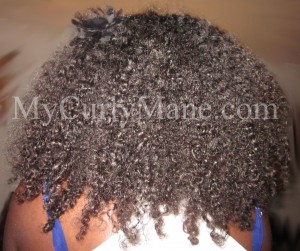
This is my hair on the 2nd day. I had near duplicate results on the 3rd day. Note the fuller texture due to humidity. AVG still gave me great definition, soft hair, and little frizz. I accessorized this look with a black flower.
Repeat the steps used for the 2nd day (above). I skipped the aloe vera gel and just added more leave-in, as I felt my hair needed a little more moisture. Once again, listen to your hair.
Try aloe vera gel on your natural hair. If your hair and scalp permits, you can continue to wear your hair in this style for consecutive days. Just repeat the steps above. Try it (don’t forget the gloss and glam!) and share your results.


Recent Comments