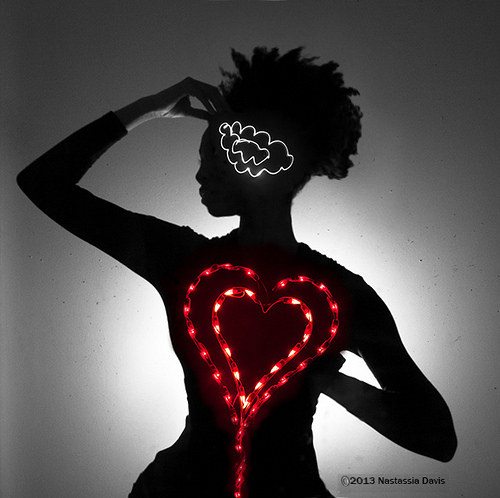
by Nay | Feb 18, 2013 | Life Lessons, Tips
Love is always bestowed as a gift – freely, willingly and without expectation. We don’t love to be loved; we love to love.” ~ Leo Buscaglia
Does this sound familiar? You big chopped or grew it out. Either way, you finally learned to embrace your curly mane. Heart racing with excitement, you couldn’t wait to explore the infinite possibilities that lay ahead on your head. Suddenly, along the way, you hit a bump in the road. You found yourself getting frustrated with knots, dry hair, and breakage. The level of joy you once had at the beginning of your adventure dips and dives into frustration, and you nearly forget the love you once had for your natural hair.
Like personal bonds, the relationship we have with our curls can hit a rut, causing us to forget what we once cherished. Take a seat. I’m going to share with you some timely tips on loving your natural hair. Hope you had a Happy Valentine’s Hair Day!
Keep Committed
Let’s face it. Sometimes the latest styles don’t come out as expected, and we can’t seem to give our hair just what it needs. There are challenges that come with being natural, but let’s not forget that similar challenges exist for relaxed or straightened hair. The grass isn’t always greener. The secret is to stay committed. Don’t give up on your curls and waves. Instead, give yourself time to figure out and rediscover your hair. Hang in there.
Communication Is Key
I say this time and time and time again. *Spins head round and round* Communication is critical! You have to take time to listen and look closely at your curls in order to identify its needs. Whether it basks in your latest conditioner by snuggling curling up tightly or rejects a styler by splitting ends, your hair will let you know! If you pay attention to the signs and gently address your hair’s concerns, it will reward you in return.
‘Do Dates
Friday nights or Saturday mornings may be prime time for tuning into Housewives … or heck, being a real-life housewife, but you can also use that time to give your hair a little TLC. Set aside at least 30 minutes of “me-time,” to explore the many ways to care for your curls. Try a new style; test a product; or indulge in a deep treatment. By experimenting and setting aside playtime, you will take your curls to the next level.
Fight Fair
Are you roughing-up your hair with harsh combs, brushes, and scraggly nails? If so, stoooooop! Never abuse your hair. You will always get better results by handling your hair with kid gloves aka treating it like it’s your first and only pair of Manolos. The gentler the care, the sweeter the results will be. Have patience.
Cherish Curls
Stop commanding your hair to pop and twirl like the next one. Remember that your curly mane is unique. It isn’t fair for you to demand it to look or behave like anyone else’s. Look back at why you originally decided to embrace your tresses and how happy it can make you feel. Keep your “mane” love in the forefront.
We all go through ups and downs throughout our relationship with our hair. You just have to remember that it’s all a part of the course and worth it in the end. Got some more tips? Share them below.
by Nay | Feb 1, 2013 | Tips
Your toes will curl up tighter than a house landing on the Wicked Witch of the West. Your eyes will sloooowly roll to the back of your head. “What’s this crazy curlie talking about now?” you ask. Scalp massages!
Come back. Don’t walk away. Trust me! You may just want to consider adding scalp massages to your hair ritual. Scalp massages open up the blood vessels in your head, increasing the flow of blood to the hair follicles. This increased flow strengthens your roots and helps your hair to grow. Yes, you heard correctly. Want long locks that you can whip back and forth? Try regular scalp massages.¹
Oh, but wait. There’s more! Scalp massages not only feel good, but they have physical benefits as well. According to the National Center for Complementary and Alternative Medicine, the act of soothing your scalp can increase production of endorphins and serotonin, thereby putting you in a relaxed mood. It also reduces muscle tension, helping to relieve pain brought on from migraines.²
Are you now sold? Here are some tips you can use to enhance your results.
1. Add oil. You already know that I swear by the use of oils for natural hair. In my previous post on winter-proofing your poof, I mentioned that oiling your scalp can prevent dandruff. Did you know that regular scalp massages using oil can increase the strength of your roots, making your curls less prone to breakage?¹ Oh, yes, it does. For greater penetration, try warming the oil before applying it to your scalp.
2. Use your fingertips … not nails. I’ve mentioned this before, and I’ll say it again. I’ve been guilty of using my nails to wash my scalp … but they’re short. I promise! When kneading your scalp, use your fingertips to ensure that you do not damage your hair follicles. You don’t want to end up losing hairs!
3. Use tools. If you want to ramp up the tingly sensation, use a Tangle Teezer or scalp massager. Those pins and prongs can hit just the right acupressure points to make Calgon take you away! Remember that one?
Ah ha! Caught ya! I see your fingers creeping to your scalp. Before you begin dozing off from relaxation, let me know if you indulge in regular scalp massages.
[sources: Livestrong¹ , Mayo Clinic² ]
by Nay | Jan 29, 2013 | Tips
For the last week, boxes of tissues have become my best friend along with good ol’ Robitussin and chicken noodle soup. Yes, I’ve been hit by a baaad cold … and thankfully not the flu! You too? This winter has been up and down, which is why you not only need to care for your body, but you also need to give added TLC to your curly mane. During these colder months, your hair will be on an endless quest for moisture. Let me point you in the right direction (musters up strength to raise pointer finger and lead the charge)! Here are a couple of ways in which you can winter-proof your poof.
“I’m itchy and dry. I can’t stop flaking,” says Your Scalp.
If your scalp is suffering, apply tea tree oil directly onto it daily. You can also warm the oil before massaging it onto your scalp. According to the Mayo Clinic, tea tree oil “comes from the leaves of the Australian tea tree (Melaleuca alternifolia) and has been used for centuries as an antiseptic, antibiotic, and antifungal agent. It’s now included in a number of shampoos found in natural foods stores.”
According to WebMD, the Aboriginal people in Australia have used tea tree oil as a topical scalp treatment for centuries. Centuries?! Something tells me that they’re onto something! Just be careful, as tea tree oil may cause allergic reactions.
Bonus: Got leftover oil? You can use it to treat toenail fungus. Yes, ladies. Let’s get it together for the summer. 😉
In addition to tea tree oil, you should adjust your shampoo by either:
- Replacing it with a moisturizing shampoo (if you aren’t already using one)
- Adding a bit of oil to your shampoo. I recommend adding jojoba, coconut, Vatika, and/or tea tree oil. Click here to read my post on the benefits of oils for natural hair and how to use them.
- Cutting down or stop shampooing altogether. Instead, just use conditioner to wash your hair aka co-washing.
“I’m so thirsty; I may just break off and die,” says Your Curly Mane.
- Condition. Condition. Condition! I can’t stress enough the importance of using conditioner during the winter. Traditional conditioner and leave-in conditioner will fortify your strands and prevent them from breaking. Your hair will need this more than ever, so use a conditioner/leave-in each time you wash your hair. Don’t forget to apply extra conditioner to the ends of your hair to prevent them from splitting. These old timers are easily weakened by winter weather, so give ‘em a little lovin’.
- Seal The Deal. All of your conditioning will be in vain if you don’t seal in your hair’s moisture with oil. It’s hard enough for sebum (natural oils from your scalp that moisturize your hair) to travel down your hair, so you’ll need to add oils instead. Just note that if you do get second, third, fourth, etc. day hair, you may need to rehydrate your curls by spritzing with water/a water mix and sealing your strands yet again. Sealing will also help smooth your hair’s cuticles, reducing frizz.
- Try A Protective Style. This is the perfect season to try to perfect your braid-outs and twist-outs. Protective styles are just as they are called. They help keep strands and delicate ends protected at night or all day, depending on the style.
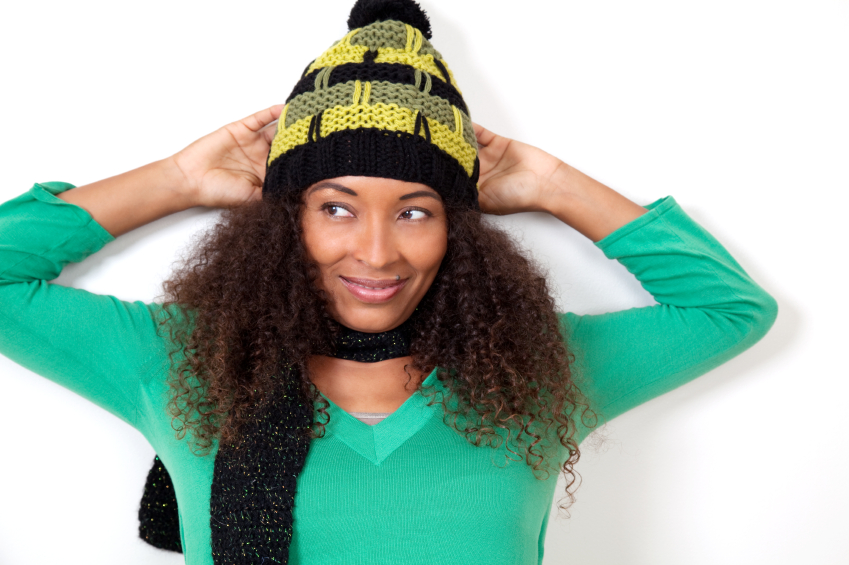
- Top It Off With A Satin-lined Hat. Any hat will help protect your hair from harsh winds, but satin-lined hats will protect your hair, help retain moisture, and secure your style! It’s a win-win all around! If you’re seeking a satin-lined hat for your curly mane, check out my review of Threadmill hats.
“I’m thirsty and have flakes. What’s a curl to do?” asks Your Curly Mane & Scalp.
 Get thee regular deep conditioning treatments! Your best bet is to make your own concoction that includes a combination of your favorite conditioner (nourishment) and oils (softens and protects) as a basis. I suggest:
- Hello Hydration Conditioner
- Vatika oil, coconut oil, jojoba oil, and olive oil
For an extra boost, add any of the following to your mix:
- Honey – Retains moisture (It is a humectant) and adds shine
- Eggs – Adds protein and nourishes your hair
- Banana – Aids in hydration
- Avocado – Truly deep conditions. “It’s high in vitamins B and E, which work at the cellular level to protect and strengthen hair,” according to LIVESTRONG.
- Mayo (eggs, vinegar, and oil) – Moisturizes hair
- Shea Butter – Moisturizes hair
Tapping into your inner mixtress, apply the deep conditioner to your hair and cover it with a plastic cap. Leave this on for at least 30 minutes. For greater hydration, sit under a hooded dryer or apply a heat cap for at least 30 minutes.
“I’ve found a thing or two, and now I’m passing it on to you,” says My Curly Mane.
This winter, I’ve been wearing my hair in wash and gos the majority of the time … although I thought I would do more braid-outs. Although I’m doing more wash and gos, my hair is actually washed every 3-4 days. I’m also co-washing much more often. In addition, when I use a moisturizing shampoo, I only apply this to my scalp. This routine has been helping to keep my hair moisturized. So far. So good.
How are you winter-proofing your poof? Drop a tip or two below … and don’t forget to bundle up!
by Nay | Dec 9, 2012 | Mane Styles, Tips
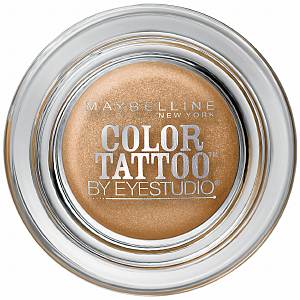
Maybelline Color Tattoo in Bold Gold
I’ve got color; yes, I do! I’ve got color; how about you?!
I just love hair color. I think it’s a great way to accent our curls, particularly in the form of highlights. Warning! As much as I love coloring my hair, it was one of the evil culprits that caused damage. Sit back and relax for a quick recap!
History Lesson
Years ago, I would embark on weekly adventures with color, changing my hair from red to blond and back again. That was until my curly mane had enough. It drop-kicked my bottles of developer and dyes and played dead on my head … well, hair is naturally dead (ha!), but this was something entirely different. Over processing my hair through bleach and dyes left it in a limp state.
Just when I began to rehab my curls, I once again decided to get color in the form of highlights. I figured this would be less damaging, particularly since I was seeking the help of a professional stylist. Mistake! The hairdresser, who between breaks of nibbling on her lunch, over processed the front, left section of my hair. This area stopped curling as well, not to mention it was completely colored instead of highlighted! Needless to say, these and other experiences made me walk away from hair coloring.
Still, I just can’t help drooling over other curlies’ expert highlights. It makes me pause and briefly consider another bout with dyes. Fortunately, natural hair blogger Curly Nikki recently flagged a sneaky way in which we can get faux hair color by using cream eye shadow. Boing! That’s the sound of your head rattling. I know. I know. You must be thinking that us natural ladies have lost it again. Here comes another crazy concoction or method of styling. No, actually this one is quick and easy. It’s also a fun way to mix up your look.
Tools:
- Maybelline 24 Hour Eyeshadow, Bold Gold
- Your curly mane, of course! – My hair was styled in a wash and go.
- 10 minutes max

Faux Hair Color with Maybelline 24 Hour Eyeshadow, Bold Gold
Instructions
I literally dug my fingers into this creamy eye shadow (frowning and naysaying along the way), and randomly smoothed it down my strands, twirling it around my finger. I concentrate more of the product on the hairs around my face. I had to use a generous amount since it wasn’t initially apparent on my dark hair. You’ll need to wash and scrub this from your hands and nails. Not too bad, but it can be a little messy.
Appearance
The eye shadow gave my hair a slight shimmer and gold highlights! I was pleasantly surprised. Although the shadow itself is marketed as lasting 24 hours, hence its name as a tattoo, this faded out of my hair throughout the night.
When I woke up in the morning, it was gone! I had to check my pics to remember that I applied it! The only evidence is slight traces of shimmer. This worked perfectly for styling my hair (and eyes) before I headed out to a reggae concert. I think the rocker look is perfect for heading out on the town, but it may be too much for conservative office environments. The choice is yours.
If you give this look a go, please comment and share pics below! You can also view this post and join the conversation over at Curly Nikki.
by Nay | Nov 17, 2012 | Life Lessons, Mane Styles, Tips, Uncategorized
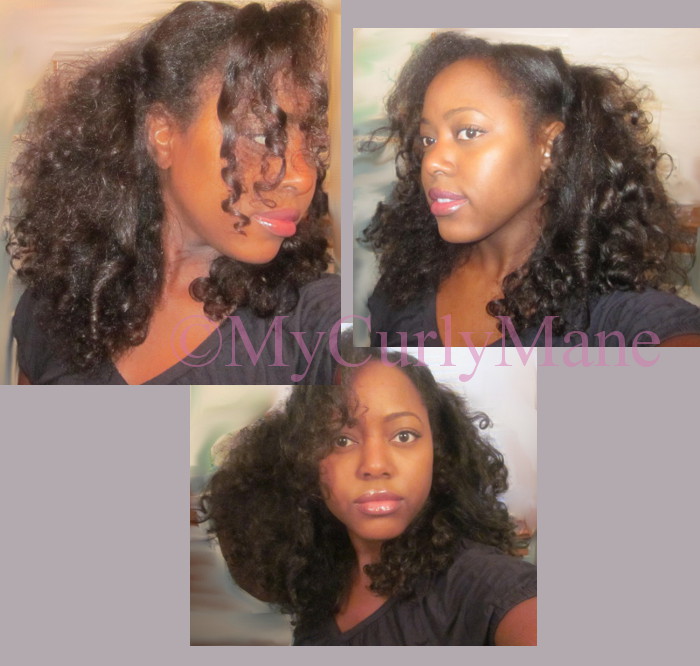
My natural hair was straightened and curled. This look lasts for 3-5 days (for my mane).
Attention dear friends. Recently I celebrated my birthday! Yes, curlies. My curly mane and I are literally older … and hopefully wiser! To celebrate this milestone (no, I won’t reveal the numbers as yet … gulp!), I straightened my mane! Believe it or not; I actually departed from curls to sport straightened locks. First, I wanted to mix it up for a few, celebratory days. Second, I wanted to conduct a length check.
You see. For about a year, I swore that my hair wasn’t budging past near mid-back/bra-strap length, but I now know that my hair needs less direct heat aka flat ironing in order for it to thrive. At the start of the summer, I made a commitment to reduce the amount of time in which I’d straighten my hair and experiment more with my natural hair. In doing so, my hair has gotten even healthier than before and longer!
That being said, it was time to straighten my hair the safer way—roller settting and then lightly flat ironing. Here are a few steps (as well as grown lady tips!) in which you can follow to capture this look.
Tools:
- Clarifying or Moisturizing Shampoo
- Conditioner
- Leave-in conditioner (I use Silicon Mix Intensive Leave in Hair Shine and Conditioner since the silicones it contains help to trap moisture into the hair and prevent frizz )
- Oil (I love my Vatika Oil mix)
- Regular tooth comb (not wide or fine, just right and easy to use)
- Snap-on, hard, magnetic rollers aka rolos 🙂 You can also use flexi rods if this is easier.
- Soft rollers covered in satin
- Spray Bottle (fill with water)
- Hard hat dryer (I have a Pibbs but Belson Elite Ionic Tourmaline Rollabout Dryer works well)
- Setting lotion = optional. I don’t use it, but if you want more hold then use this.
- Heat protectant spray (always recommended, but I tend to skip this in favor of an oil or butter)
- Flat iron (I use a Maxiglide)

Tools of the trade and steps needed in order to roller set natural hair.
Steps
- Start with a clean slate. Wash and condition your curly mane as you normally do. I like to clarify my hair, so it is completely clear of other products, particularly those that work with my natural curls but not with straight tresses.
- Apply leave-in conditioner. I tend to add a lot of product to the ends of my hair, since I will be using a flat iron, and I don’t want to dry out my ends. Calling all bandits! Split ends will rob you of length retention.
- Keep hard rollers (for drying under the hard hat) at your side, and section your hair from the back to the front of your head. Create sections at the appropriate size of each hard roller. If your section is too large for the roller, your hair will take much longer to dry.
- Comb out each section of hair, spritz to keep it moist, and roll it with a roller. Apply tension to your hair as you roll, so your hair is as straight as possible. If you want more hold, spritz setting lotion onto the hair as you roll it. Warning: I am absolutely the worst at roller setting! If you’re in this club, it’s okay. You want to focus on getting the hair smooth and simply roll it as close to the scalp as possible. When you flat iron, it will work out the kinks. I also do not create neat rows. I haven’t gotten this down, so I roll my hair in the same sections I use for braid outs.
- After roller setting your entire head of hair, sit under a hard hat dryer for at least 30 minutes. Please gauge this according to your hair length and drying needs. Your hair must be completely dry to avoid frizz.
- Undo your rollers. You’ll notice that your roots may still be poofy. Ah, our curly manes win again! Once again this is okay. See my photo. My hair length may not be as kinky curly as it was originally, but my roots are still poofy. Once again, no need to fret.
- Apply oil all over your hair. This works as a heat protectant and adds sheen.
- Dust off your flat iron. My Maxiglide felt a little foreign in my hands. It took me a minute to remember how to use it! Anyhoo, grab your flat iron and straightened your hair, working in small sections from the back to the front of your head. I apply a minimal amount of heat needed to straighten it. I also like to bump (curl) the ends for body.

That’s it! You now have straight hair!
Optional: Do you want beachy, bouncy curls? If so, as you flat iron each section, roll it with a soft, satin roller. Leave the soft rollers in your hair for at least an hour. When removed, you will have large, curls and waves.
Runway Styling & Nighttime Maintenance
While I like to have straight hair for the first day. Each day afterwards, I like to rock that Victoria’s Secret-esk, beachy look. Lol! This protects my ends and doesn’t require flat irons to maintain the look. To capture this look, I begin by oiling my entire hair, particularly the ends, each night. Afterwards, I use the soft, satin rollers to roll my hair. I apply a satin cap over the rollers for extra protection and to keep the positioning of the rollers. Off to bed you go! In the morning, remove all and voilá! Repeat each night for a hot look and simple, safe upkeep.

On the first day, my straightened mane easily reverted (on right). This tends to happen when natural hair hasn’t been straightened for a while. I applied a minimal amount of heat that night and roller set my hair with soft, satin rollers.
Grown Lady Lessons
As I mentioned prior, the clock is ticking and tocking. Sigh. You may have guessed it. I am one of those gals who hit a birthday and had a bit of the blues followed by the highs of all the lessons learned. I am blessed to blow out another candle, and in doing so, want to share a few lessons with you. As always, each one teach one.
On Hair (of course!) …
- Slow and steady wins the race. Chances are you will not figure out your hair overnight … and that’s okay! I’m still discovering my hair’s capabilities.
- The best manes are the result of gentle care and healthy hair. These tips are underrated but produce the best results. Healthy hair that’s treated kindly will always look good.
- It’s okay to keep the same style until you master your hair and other looks. Don’t feel pressured to have the same results as other curlies. Focus on your own progress. Remember #1: slow and steady wins the race!
On Life …
- It’s okay to be different. It’s everyone else’s problem if you do not fit into a mold. Seize the opportunity to enlighten them. If they don’t get it, keep it moving!
- Not everyone will like you. Ugh! “But why?” you say. “I am so kind and God-fearing.” Sadly, even the best of us will get shunned or bullied once in our lives. I know. It isn’t right. It’s just human nature. You just have to remember to be above it. Once again, it’s their problem. Keep it moving!
- There’s nothing better than being kind to yourself. Woooah there, lioness! Go easy. Don’t put so much pressure on yourself. Even if you believe you haven’t accomplished as much as you’d like to by your age, note the many lessons learned (I hope!), adventures undertaken (even the minis), and plain ol’ fashioned growing up that you’ve done. Be kind to yourself. You deserve it. If you’ve had a b’day or you’re approaching one, happy you day to you!
by Nay | Nov 4, 2012 | Tips, Uncategorized
May it be a light to you in dark places, when all other lights go out.”
~ J.R.R. Tolkien, The Fellowship of the Ring

Washing my curly mane in the sink. No, don’t use the dish washing liquid shown! 🙂
Before she even arrived, Hurricane Sandy was called the perfect storm. Perhaps this is because she was perfectly disastrous. On the east coast, Miss Sandy uprooted many trees, destroyed homes, cars, streets, and left many without electricity, including myself. Our lifestyle definitely went back to basics. With work still a possibility the next day, I needed to have my hair somewhat presentable in the event that I was called into the office. This required a much needed washing of my hair … without hot water!
Those of us with easy access to clean, hot water are veeerrrry lucky. I remember my first experience as a child visiting family in Jamaica and experiencing the culture shock … of my own culture! At that time many places in Jamaica did not have hot water running through the pipes. Today, here in the states, Sandy has contaminated water supplies and left many without access to power and ultimately clean, warm water. I extend my prayers to all whom have been affected by this travesty.
First day results of a braid-out with aloe vera gel.
In the sake of actual necessity and much needed levity, let me share some hair care tips in the event that you’re left without warm water and for some reason or another need to wash your hair. This is simple and maybe common sense, but sometimes, you’re thrown off when comforts are removed. We’re gonna take this back Little House on the Prairie-style! 😉
Tools:
- Kettle
- Large Pot
- Sink or Bathtub (to wash hair in)
- Water (seriously, you’ll need this)
- Gas/electric or solely gas burning stove (seriously!)
- Preferred Moisturizing Shampoo – skip if you’re doing the conditioner only/Curly Girl Method. I used Crème of Nature Argan Oil Moisture and Shine Shampoo.
- Preferred Conditioner – My staple is Herbal Essences Hello Hydration Moisturizing Conditioner.
Steps:
- Pre-poo – Before washing my hair, I applied conditioner onto it, since I recently straightened my curly mane and wanted to restore its moisture balance. You can do this too if you simply want to ensure that your shampoo doesn’t completely strip your hair from oils. I left the conditioner in for about 10 minutes.
- Heat water in a kettle – Gauge the amount based on your curly mane’s needs.
- Place large pot aside, where you can easily grab and use it. You will pour water from the pot onto your hair—not straight from the kettle! Hey, some curlies need a slower pace and heads up. I’m not mad at you!
- Transfer some of the heated water into your pot. You’ll want to leave some water for additional rinsing of your hair.
- Shampoo hair in a sink or bathtub.
- Add cold water to the pot with hot water. The temperature should be comfortable for pouring onto your hair.
- Pour warmed water from the pot onto your hair.
- Condition your hair.
- Transfer more hot water from kettle to the pot and add cold water.
- Pour warmed water from the pot onto your hair.

Second day results of re-braided hair using Beautiful Textures Moisture Butter
Work in this manner (combining water from the kettle and cold water from your sink into the pot) until your hair is clarified. Simple!
Styling:
You can proceed with a wash and go. However, I knew that I wouldn’t be able to stretch and style my hair using a blow dryer (no electricity), as I typically do. If you have time on your hands, here’s what you can do—Braid-outs!
Check out my post on how to get stretched results with Fruit of the Earth 100% Aloe Vera Gel. Of course, you’ll have to skip the steps in which a blow dryer is used. I used aloe vera gel on the first day and Beautiful Textures Moisture Butter Whipped Curl Creme to re-braid my hair on the second day. Details on this butter will be shared in an upcoming post.
I re-braided my hair at night until our hot water returned, saving water and electricity, while gaining time needed to tend to my family. That’s it! Simple lifestyle, easy hair care, many blessings.